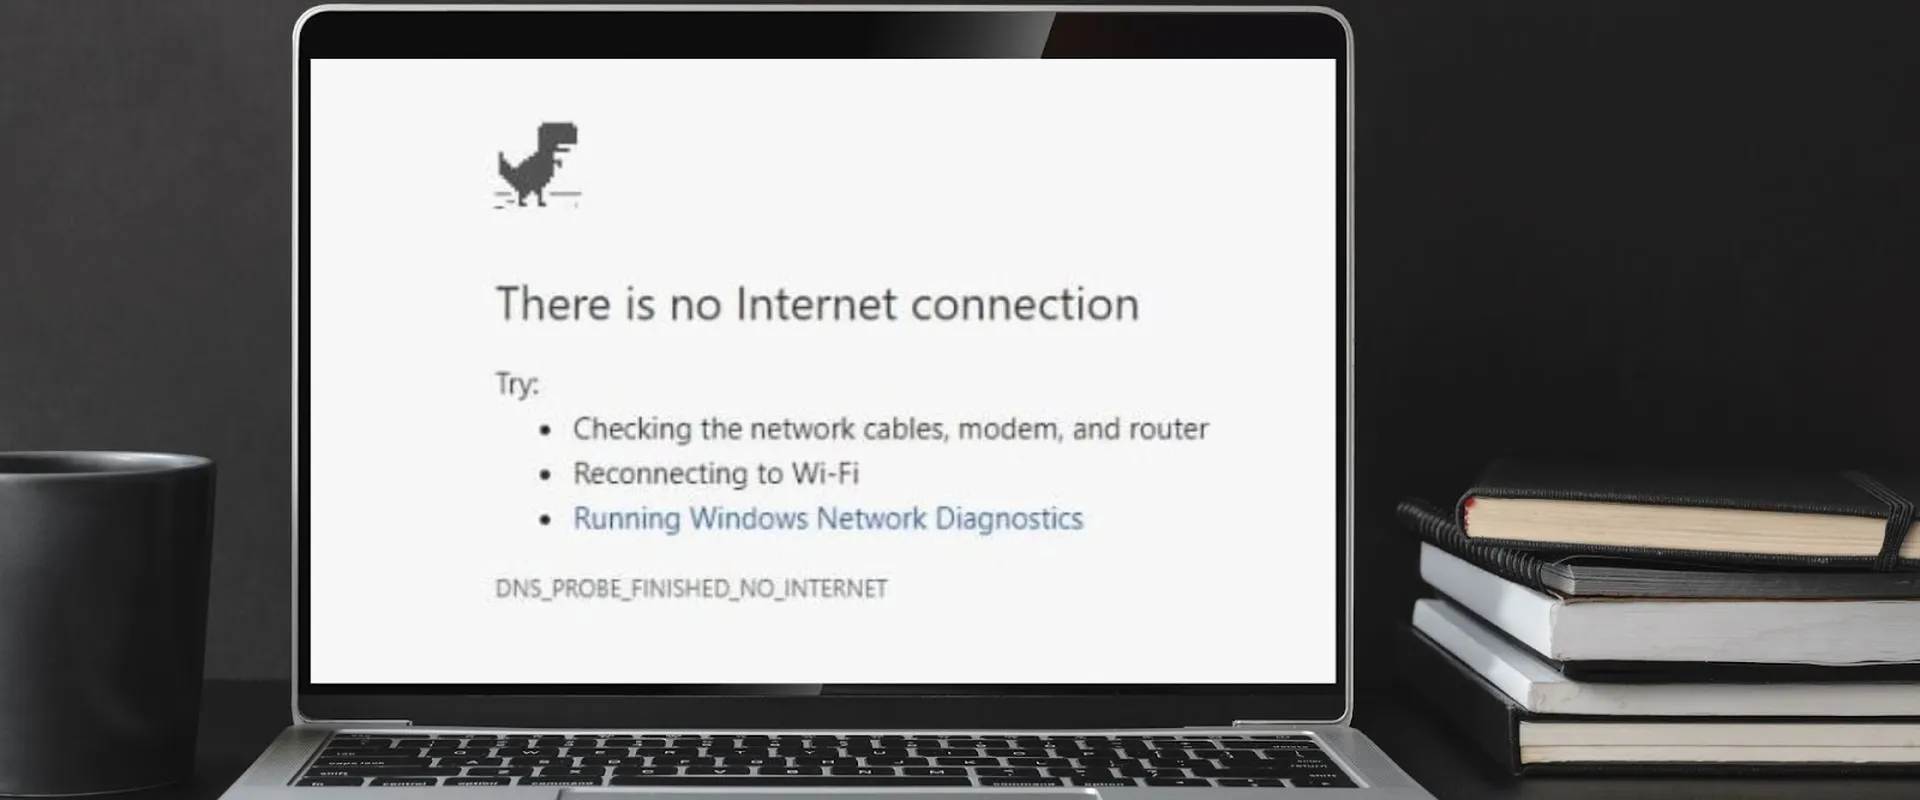
Solving the Mystery of DNS Probe Finished No Internet Error
Users frequently encounter the DNS Probe finished with no internet error when attempting to reach the internet. Dealing with the error notice, which reads dns_probe_finished_no_internet, can take time and effort. We will examine the root reason for this error and present fixes in this article.
What Causes The DNS Probe To Finish No Internet Error?
A DNS (Domain Name System) configuration issue on the user’s device is the primary cause of the finishing with no internet error.
Domain names, like www.google.com, are transformed into computer-understandable IP numbers by the DNS. The device cannot reach the internet without a DNS configuration issue.
Common Causes of DNS Configuration Issues
- Incorrect DNS settings on the device
- Issues with the DNS server of the internet service provider
- Corrupted DNS cache on the device
- Outdated network drivers
- Malware or viruses on the device
How To Resolve The DNSProbe
You can attempt several solutions if you are experiencing a DNSProbe error. The stages are as follows:
Flush the DNS Cache
Step 1: Open the Command Prompt on your computer or smartphone to clear the DNS cache.

Step 2: Run the “ipconfig /flushdns” instruction.
Step 3: As soon as the DNS cache has been flushed, wait for the confirmation notification.

Change DNS Settings
Step 1: Navigate to your device’s Network Connections options.

Step 2: Right-click on the network link you’re currently using to select it.
Step 3: From the drop-down option, select “Properties.”

Step 4: Click “Settings” after selecting “Internet Protocol Version 4 (TCP/IPv4)”.
Step 5: The IP address of a public DNS server, such as Google’s DNS server (8.8.8.8) or OpenDNS, should be entered when selecting “Use the following DNS server addresses” (208.67.222.222).
Step 6: To save the adjustments, click “OK.”

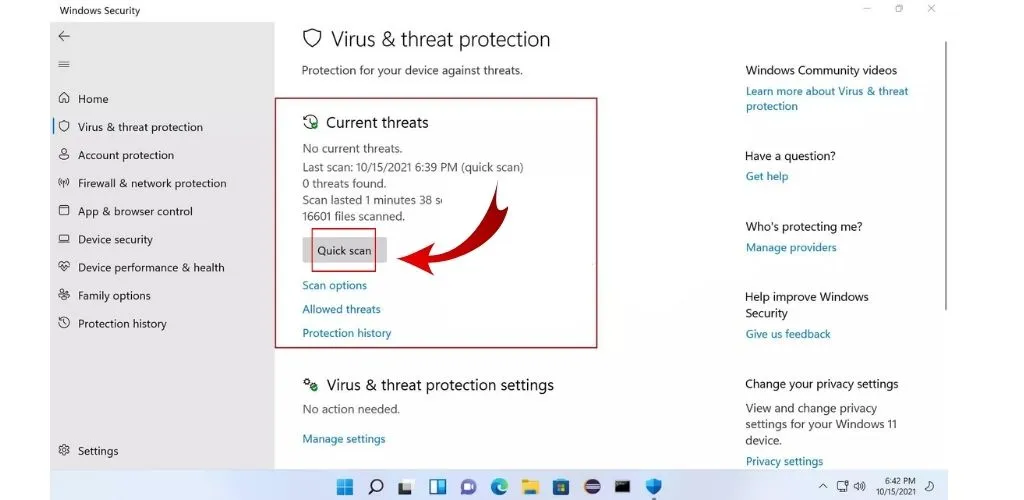
Check for Malware
Step 1: Use an antivirus program to scan your gadget for malware.
Step 2: Follow the antivirus software’s removal directions if malware or viruses are discovered.
Restart the Router
Step 1: Remove the router’s cable from the power supply.
Step 2: Take a short while.
Step 3: Reconnect the router’s power, then wait for a complete reset.

Update Network Drivers
Step 1: Visit the company’s webpage that makes your network adapter or device.
Step 2: Look for your device’s most recent network driver upgrades.
Step 3: Updates can be downloaded and installed as required.

Advanced Solutions for the DNS-Probe-Finished-No-Internet-Error
If the standard solutions for the “DNS_Probe_finished_no_internet_error” issue do not work, there are some advanced solutions that the user can try:
Disable Firewall
Step 1: Press the Windows key and R on your keyboard to display the Run dialogue window.
Step 2: Click OK after typing “control panel.”
Step 3: Select “System and Security,” then choose “Windows Defender Firewall.”
Step 4: In the left sidebar, select “Turn Windows Defender Firewall on or off.”
Step 5: Choose “Turn off Windows Defender Firewall (not recommended) for private and public networks.”
Step 6: After saving the changes, click “OK” to see if the error has been fixed.

Reset Network Settings
Step 1: Press the Windows key plus R on the keyboard to open the Run dialogue box.
Step 2: Enter “ncpa. cpl” after typing it.
Step 3: Right-click the problematic network connection and choose “Properties.”
Step 4: Select “Internet Protocol Version 4 (TCP/IPv4)” from the list at the bottom, then click the “Properties” button.
Step 5: Pick “Obtain an IP address automatically” and “Obtain DNS server address automatically” from the menu options.
Step 6: After saving the changes by clicking “OK,” restart the computer.

Check Router Configuration
Step 1: Launch a browser and enter the router’s IP address (typically 192.168.1.1 or 192.168.0.1) in the address bar.
Step 2: To access the router settings, enter the user name and password (check the manual or contact the manufacturer for default login credentials).
Step 3: Find the DNS settings and check that “Obtain DNS server address automatically” is selected, or enter the DNS server address provided by the ISP.
Step 4: After saving the adjustments, restart the router.

Use a VPN
Step 1: Get a VPN program or extension from a reputable provider.
Step 2: Start the VPN application and join a server in another city or nation.
Step 3: Launch a web browser and verify that the issue has been fixed.

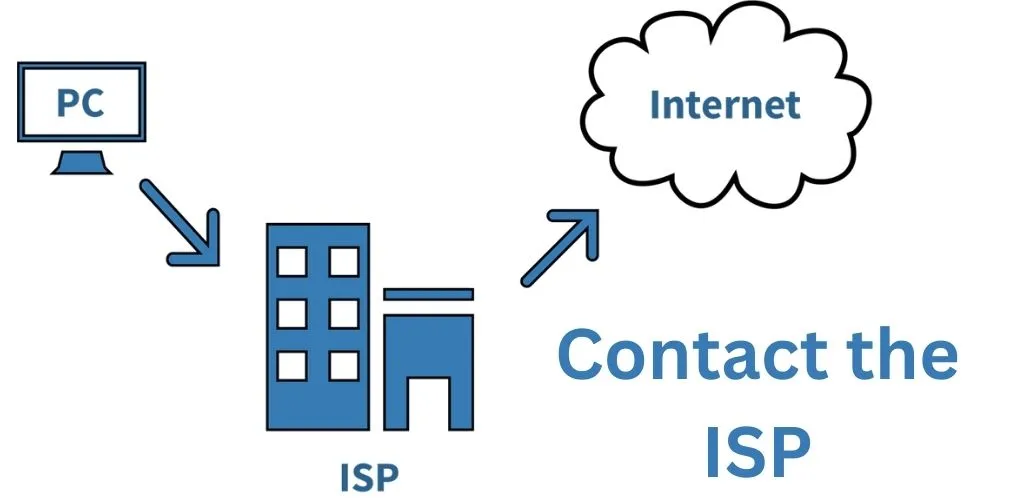
Contact the ISP
Step 1: Contact the ISP support staff by phone, email, or live chat.
Step 2: Describe the problem and the steps you’ve already taken to fix it.
Step 3: To fix the problem, adhere to the guidance offered by the support staff.
Step 4: If the problem still needs more help or a technician to come to your location to fix it.
Prevention
While it’s not always possible to prevent the Error from occurring, some steps can be taken to minimize the chances of it happening:
Keep Device and Software Up-to-Date
Keeping the device and software up-to-date can help prevent various issues, including the Error. The user should regularly check for updates and install them when available.
Use a Reliable DNS Server
Using a reliable DNS server can help prevent issues with DNS configuration. The user can try using a public DNS server such as Google’s DNS server (8.8.8.8) or OpenDNS (208.67.222.222) instead of the default DNS server provided by the internet service provider.
Perform Regular Maintenance on the Device
Performing regular maintenance on the device can help prevent various issues; The user should regularly perform tasks such as clearing the browser cache and cookies, running malware scans, and flushing the DNS cache.
Check Router Configuration
Checking the router configuration and ensuring that it’s set up correctly can help prevent issues with the DNS server of the internet service provider. The user should check the router manual or contact the manufacturer for instructions on accessing and adjusting the router settings.
Use a Good Antivirus
Using good antivirus software can help prevent malware infections on the device. This can help avoid the No Internet Error and other issues caused by malware.
Troubleshooting Tips
When faced with a no Internet Error, it can be helpful to know some troubleshooting tips to help resolve the issue.
Check the Internet Connection
Step 1: Verify whether the network icon on the device indicates a connection.
Step 2: Check Internet connectivity by attempting to access a website.
Step 3: Check the network settings on the device if there is no internet connection, and then use the on-screen instructions to troubleshoot the connection.

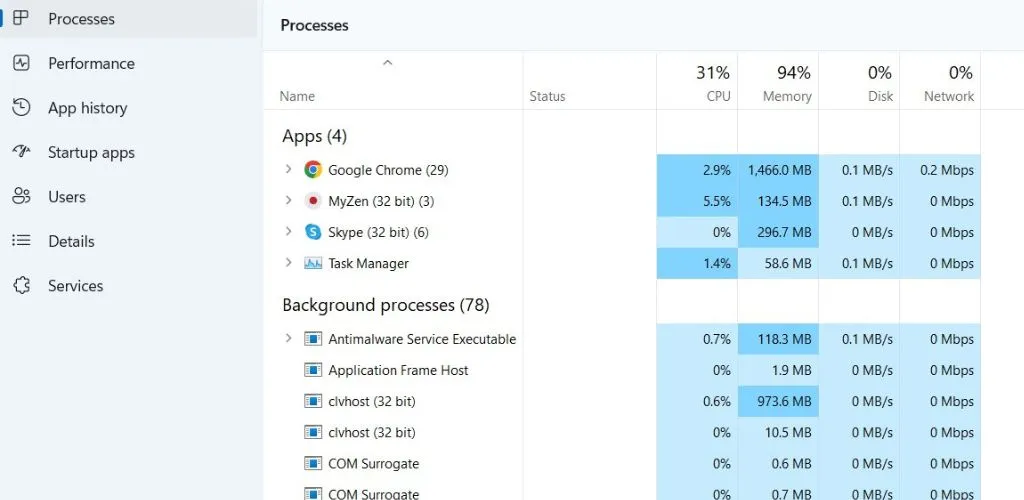
Check for Conflicting Programs
Step 1: To launch the Task Manager, press the Ctrl, Shift, and Esc keys on the keyboard.
Step 2: Look for any VPN or proxy programs in the list of active programs.
Step 3: Switch off these programs momentarily to see if that helps.
Disable and Re-enable Network Adapter
Step 1: Press the Windows crucial and X on the keyboard, then choose “Device Manager” from the list.
Step 2: Enlarge the section labeled “Network Adapters.”
Step 3: Right-click the problematic network adapter and choose “Disable device.”
Step 4: After a brief delay, select “Enable device” from the context menu when right-clicking on the same network adapter.
Step 5: Verify the problem has been fixed.

Check Router Configuration
Step 1: Launch a browser and enter the router’s IP address (typically 192.168.1.1 or 192.168.0.1) in the address bar.
Step 2: To access the router settings, enter the user name and password (check the manual or contact the manufacturer for default login credentials).
Step 3: Verify the router configuration to ensure it is properly configured. Make sure that “Obtain DNS server address automatically” is selected in the DNS settings or that the DNS server address given by the ISP is entered.
Step 4: After saving the adjustments, restart the router.

Try Different Browsers
Sometimes, the DNS_Probe_Finished_No_Internet_Error can be caused by an issue with the browser being used. The user should try accessing the internet using a different browser to see if this resolves the problem.
Following these troubleshooting tips, the user can quickly identify the cause of the DNS probe finished with no internet Error and take the appropriate steps to resolve it. Remember that this error can have multiple reasons, and it may take a combination of different solutions to fix it.
Conclusion
The “No Internet Error” can be challenging to troubleshoot, but in most cases, the advice above will help you fix the problem. Before using a device, users should check their internet connection and ensure it is connected correctly. Then, they should look for incompatible programs and momentarily turn them off. If none of these suggestions works, they can try verifying the router configuration or turning off and back on the network adapter.
FAQs
A. This error frequently happens when using a web browser to access a website. The device cannot link to the website’s server, and the DNS lookup attempt was unsuccessful.
A. No, this error can happen on any internet-connected device when using a web browser to visit a website.
A. With some or all networked devices, it might occur. All devices on the network may be impacted if there is a problem with the DNS server of the internet service provider.
A. No, both wired and wireless network links are susceptible to this error. It is not specific to a particular form of network connection.